Whether you are setting off on your debut hunting trip or need something for your outdoor adventures, optics are essential tools. If you are walking into a shop or browsing the internet for your first-ever quality optical device, you might feel a bit overwhelmed.
With hundreds of models of quality binoculars with different specs and prices, how do you decide which ones will best fit your needs? Let’s shed a bit of light on the subject and help you make the best decision for your specific needs.
What Do the Numbers on Binoculars Mean?
Magnification and Objective Lens
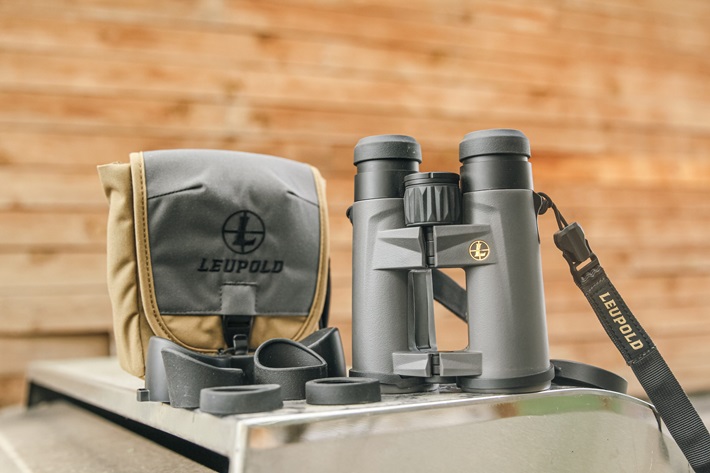
Every binocular model displays two numbers, such as 8×42 or 10×50. The first number is the magnification power—how much closer something will appear compared to the naked eye. The second number indicates the diameter of the objective lens (front lens) in millimetres and how much light the binoculars can gather.
An 8×42 binocular makes objects eight times nearer with a 42mm objective lens. Higher magnification sounds good, but comes with trade-offs. Magnifications above 10x are difficult to hold steady in your hands and give a more restricted field of view. For most first-time buyers, 8x or 10x magnification is an excellent compromise between image stability and clarity.
The objective lens size affects brightness and performance under low light. Larger lenses capture more light, generating brighter images but also adding weight and bulk. A 42mm objective lens is the best choice for general use, offering good light transmission and portability.
Essential Features to Consider
Exit Pupil: Calculated by dividing the diameter of the objective lens by the magnification (42÷8=5.25mm), the exit pupil is the diameter of the incoming light beam in your eye. In daytime, a 2-3mm exit pupil will suffice, but for dawn/dusk or nighttime observing, make it a minimum of 5mm to match your dilated pupil size.
Field of View: This feature tells you how much area you can see at a given distance, usually in feet at 1,000 yards or degrees. The wider the field of view, the easier it is to detect and track moving objects, which is particularly helpful for bird watching and sports viewing.
Eye Relief: This is the distance between your eye and the eyepiece while still seeing the whole image. If you wear glasses, look for a set with a minimum of 15mm of eye relief. Some high-quality models have eyecups that twist up or fold down to accommodate both glass wearers and non-glass wearers.
Prism Type: The prism affects cost and performance. Porro prisms (that produce a zigzag light path) provide excellent depth perception and are typically larger and less expensive. Roof prisms yield a straight-through layout, so binoculars are more portable and durable, but typically more expensive. Either will suffice for an amateur, so consider other factors and price.
Balance and weight matter more than you might think. Even a few extra ounces become noticeable when you’re holding them up for hours. Some hunters prefer a chest harness system to distribute the weight and keep their optics handy.
Choosing Binoculars for Different Activities
The optics used for birdwatching should be light to use for extended periods of time, with 7x to 10x magnification and 32mm to 42mm objective lenses. The most common birdwatcher’s standard is the 8×42. Select close focus capability (below 10 feet) for observing birds at close distances and a broad field of view for tracking movement.
Hunting requires toughness, weather resistance and good low-light performance. Look for 8×42 or 10×42 hunting binoculars with waterproof and fog-proof features. If you do a lot of glassing over wide canyons and valleys, 10×50 or even 12×50 designs might be worth the extra weight for the additional magnification and light gathering.
For thick woods and brush hunting where shots are close and quick target acquisition is crucial, consider 8×32 or even 6×32 models for their superior field of view and portability. Rubber armour coating protects against impacts and provides a solid grip in rainy weather.
Practical Tips for First-Time Buyers
Start by setting a fair budget. While good optics are expensive, some quality manufacturers offer solid entry-level models at affordable prices. Avoid low-quality pieces as poor optics will frustrate rather than enhance your experience.
If possible, test them before purchasing. Check the focus mechanism for smoothness, look at distant objects to assess clarity, and ensure the device feels comfortable in your hands. Pay attention to image brightness, colour accuracy and edge sharpness.
Finally, invest in accessories. A padded neck strap prevents strain with prolonged use, a protective case ensures your investment is protected from damage and a lens cleaning kit maintains optical quality. Some activities can also be improved by a tripod adapter for stable, long-term viewing.
A Final Word
Choosing your first optical tool doesn’t have to be daunting. With an understanding of the minimum requirements, insight into your primary use and following these guidelines, you’ll find yourself with a pair that opens doors to new worlds of observation and fun for years to come.